Specific Examples of Components
Now I’ll give you some cheat examples for using components.
And also a little example with AJAX.
A note which applies to every featured component here:
In some situations, it could be handy that you declare the field of the component-object as a member field.
How to make a Link:
	//Within a constructor or function in a Class inherited from BasePage:

	this.add( new Link<Void>( "exampleLink" )
        {

            @Override
            public void onClick()
            {
                // Code goes here
            }

        } );
<!DOCTYPE html>
<html>
    <head>
        <title>Example Page - Experience System</title>
        <meta http-equiv="Content-Type" content="text/html; charset=UTF-8">
    </head>
    <body>
    <wicket:extend>
        <p><a href="#" wicket:id="exampleLink">click here</a></p>
    </wicket:extend>
</body>
</html>
How to make a BookmarkablePageLink:
The difference is that this type of link could be bookmarked, the other type, Link, not.
	//Within a constructor or function in a Class inherited from BasePage:

	this.add( new BookmarkablePageLink<Void>( "exampleBookLink", NextPage.class );
<!DOCTYPE html>
<html>
    <head>
        <title>Example Page - Experience System</title>
        <meta http-equiv="Content-Type" content="text/html; charset=UTF-8">
    </head>
    <body>
    <wicket:extend>
        <p><a href="#" wicket:id="exampleBookLink">click here</a></p>
    </wicket:extend>
</body>
</html>
How to make a Label:
A label is used to replace static information with information from the logic layer.
    /// Class definition inherited from BasePage

    private String personName;

    /**
     * Constructor:
     */
    public ExamplePage()
    {

        this.personName = "John Doe";

	this.add( new Label("lblPersonName", new PropertyModel<String>(this, "personName") );

    }
<!DOCTYPE html>
<html>
    <head>
        <title>Example Page - Experience System</title>
        <meta http-equiv="Content-Type" content="text/html; charset=UTF-8">
    </head>
    <body>
    <wicket:extend>
        <p>Welcome <span wicket:id="lblPersonName">Nobody</span> !</p>
    </wicket:extend>
</body>
</html>
How to make a Form:
public class ExamplePage
        extends BasePage {

    /**
     * Constructor:
     */
    public ExamplePage()
    {
        super();

        // Note: In some situations, it could be handy that you declare the field of your Form as member field.
        Form exampleForm = new Form("exampleForm")
        {

            @Override
            public void onSubmit()
            {
                // More code goes here
            }

        };

        this.add(exampleForm);
    }
}
<!DOCTYPE html>
<html>
    <head>
        <title>Example Page - Experience System</title>
        <meta http-equiv="Content-Type" content="text/html; charset=UTF-8">
    </head>
    <body>
    <wicket:extend>
        <p>This an example page</p>
        <form wicket:id="exampleForm">
            <label>This is an example of the form</label>
             <!-- More code goes here -->
        </form>
    </wicket:extend>
</body>
</html>
Some form-specific components:
How to make a Button:
Button-Objects are more used to create a submit button for the form, which each their own destination.
public class ExamplePage
        extends BasePage {

    /**
     * Constructor:
     */
    public ExamplePage()
    {
        super();

        // Note: Likely in this situation, it could be handy that you declare the field of your Form as member field.
        Form exampleForm = new Form("exampleForm");


        exampleForm.add(new Button("btnRefresh")
        {
            @Override
            public void onSubmit() {
                super.onSubmit();
                refreshScreen();
            }
        });

        this.add(exampleForm);
    }
}
<!DOCTYPE html>
<html>
    <head>
        <title>Example Page - Experience System</title>
        <meta http-equiv="Content-Type" content="text/html; charset=UTF-8">
    </head>
    <body>
    <wicket:extend>
        <p>This an example page</p>
        <form wicket:id="exampleForm">
            <label>This is an example of the form</label>
             <input wicket:id="btnRefresh" type="submit" value="Refresh" />
        </form>
    </wicket:extend>
</body>
</html>
How to make a TextField:
public class ExamplePage
        extends BasePage {

    private String personName;
    /**
     * Constructor:
     */
    public ExamplePage()
    {
        super();

        this.personName = "John Doe";

        // Note: Likely in this situation, it could be handy that you declare the field of your Form as member field.
        Form exampleForm = new Form("exampleForm");

        // Please note that there are also other type of validators available:
        exampleForm.add(TextField<String>( "txtPersonName", , new PropertyModel<String>(this, "personName") ).add( StringValidator.minimumLength( 2 ) ).setRequired( true );

        exampleForm.add(new Button("btnSave")
        {
            @Override
            public void onSubmit() {
                super.onSubmit();
                save();
            }
        });

        this.add(exampleForm);
    }
}
<!DOCTYPE html>
<html>
    <head>
        <title>Example Page - Experience System</title>
        <meta http-equiv="Content-Type" content="text/html; charset=UTF-8">
    </head>
    <body>
    <wicket:extend>
        <p>This an example page</p>
        <form wicket:id="exampleForm">
            <label>This is an example of the form</label>
            <input wicket:id="txtPersonName" type="text" />
            <input wicket:id="btnSave" type="submit" value="Save" />
        </form>
    </wicket:extend>
</body>
</html>
How to make a TextArea:
public class ExamplePage
        extends BasePage {

    private String personDescription;
    /**
     * Constructor:
     */
    public ExamplePage()
    {
        super();

        this.personDescription= "He Loves to code";

        // Note: Likely in this situation, it could be handy that you declare the field of your Form as member field.
        Form exampleForm = new Form("exampleForm");

        // Please note that there are also other type of validators available:
        exampleForm.add(TextArea<String>( "txtPersonDescription", , new PropertyModel<String>(this, "personDescription") ).add( StringValidator.minimumLength( 2 ) ).setRequired( true );

        exampleForm.add(new Button("btnSave")
        {
            @Override
            public void onSubmit() {
                super.onSubmit();
                save();
            }
        });

        this.add(exampleForm);
    }
}
<!DOCTYPE html>
<html>
    <head>
        <title>Example Page - Experience System</title>
        <meta http-equiv="Content-Type" content="text/html; charset=UTF-8">
    </head>
    <body>
    <wicket:extend>
        <p>This an example page</p>
        <form wicket:id="exampleForm">
            <label>This is an example of the form</label>
            <input wicket:id="txtPersonDescription" type="text" />
            <input wicket:id="btnSave" type="submit" value="Save" />
        </form>
    </wicket:extend>
</body>
</html>
How to make a drop down chooser:
This one is somewhat complicated, since you also have to create a special class to render each option.
public class ExamplePage
        extends BasePage {

    private Status personStatus;
    private List<Status> states;

    /**
     * Constructor:
     */
    public ExamplePage()
    {
        super();

        // Status is an enum.
        this.personStatus = Status.OK;
        this.states = Arrays.asList(Status.values());

        // Note: Likely in this situation, it could be handy that you declare the field of your Form as member field.
        Form exampleForm = new Form("exampleForm");

        DropDownChoice chsStatus = new DropDownChoice("chsStatus", new PropertyModel<String>(this, "personStatus"), this.states, new StatusChoiceRenderer());
        chsStatus.setNullValid(false);
        exampleForm.add(chsStatus);

        exampleForm.add(new Button("btnSave")
        {
            @Override
            public void onSubmit() {
                super.onSubmit();
                save();
            }
        });

        this.add(exampleForm);
    }
}

/**
 * The choice render class for the statuses.
 */
private class StatusChoiceRenderer
            extends ChoiceRenderer<Status>
{

    /**
     * Constructor:
     */
    public StatusChoiceRenderer()
    {
        super();
    }

    /**
     * @return The display value of the status
     * @param status The Status
     */
    @Override
    public Object getDisplayValue(Status status) {
        return status.getStatus();
    }
}
<!DOCTYPE html>
<html>
    <head>
        <title>Example Page - Experience System</title>
        <meta http-equiv="Content-Type" content="text/html; charset=UTF-8">
    </head>
    <body>
    <wicket:extend>
        <p>This an example page</p>
        <form wicket:id="exampleForm">
            <label>This is an example of the form</label>
            <select wicket:id="chsStatus" >
                <option selected="selected">Choose a status</option>
                <option>OK</option>
                <option>Standby</option>
            </select>
            <input wicket:id="btnSave" type="submit" value="Save" />
        </form>
    </wicket:extend>
</body>
</html>
How to use repeating for filling a Table and Fieldsets of a Form:
public class ExamplePage
        extends BasePage {

    /**
     * Constructor:
     */
    public ExamplePage()
    {
        super();

        // Note: In some situations, it could be handy that you declare the field of your Form as member field.
        Form exampleForm = new Form("exampleForm")
        {

            List persons = personManager.getAll();

            add( new ListView<Person>( "personList", persons )
            {

                @Override
                protected void populateItem( ListItem<Person> li )
                {
                    final Person person = li.getModelObject();
                    li.add( new Label( "personId", "" + person.getID() ) );
                    li.add( new Label( "personName", person.getFirstName() + " " + person.getSurName() ) );
		    li.add( new Label( "personAddress", person.getAddress() ) );
		    li.add( new Label( "personTelephone", person.getTelephone() ) );

                    li.add( new Link<Person>( "btnDeletePerson", li.getModel() )
                    {

                        @Override
                        public void onClick()
                        {
                            personManager.remove( getModelObject() );
                            this.removePerson( getModelObject() );
                        }
                    });
                }
            });

            add( new Link<Void>( "btnNewPerson" )
            {

                @Override
                public void onClick()
                {
                    this.addPerson();
                }
            });
        };

        this.add(exampleForm);
    }
}
<!DOCTYPE html>
<html>
    <head>
        <title>Example Page - Experience System</title>
        <meta http-equiv="Content-Type" content="text/html; charset=UTF-8">
    </head>
    <body>
    <wicket:extend>
        <p>This an example page</p>
        <form wicket:id="frmList">
           <wicket:enclosure child="">
                <table>
                    <tr>
                        <th>#</th>
                        <th>Name</th>
                        <th>Address</th>
                        <th>Telephone</th>
                        <th>Actions</th>
                    </tr>
                    <tr wicket:id="personEntry">
                        <td><span wicket:id="personId">0</span></td>
                        <td><span wicket:id="personName">Name</span></td>
                        <td><span wicket:id="personAddress">Address</span></td>
                        <td><span wicket:id="personTelephone">Telephone</span></td>
                        <td>
                            <input wicket:id="btnDeletePerson" type="submit" value="Delete" />
                        </td>
                    </tr>
                    <tr>
                        <td colspan="2"><input wicket:id="btnNewPerson" type="submit" value="New Person" /></td>
                    </tr>
                </table>
            </wicket:enclosure>
        </form>
    </wicket:extend>
</body>
</html>
How to hide and unhide a component with AJAX:
public class ExamplePage
        extends BasePage {

    private WebMarkupContainer callContainer;
    private Status personStatus;
    private List<Status> states;


    /**
     * Constructor:
     */
    public ExamplePage()
    {
        super();

        // Status is an enum.
        this.personStatus  = Status.OK;
        this.states = Arrays.asList(Status.values());

        // Note: Likely in this situation, it could be handy that you declare the field of your Form as member field.
        Form exampleForm = new Form("exampleForm");

        DropDownChoice chsStatus = new DropDownChoice("chsStatus", new PropertyModel<String>(this, "personStatus"), this.states, new StatusChoiceRenderer());
        chsStatus.setNullValid(false);

        chsStatus.add(new AjaxFormComponentUpdatingBehavior("onChange") {

            @Override
            protected void onUpdate(AjaxRequestTarget target) {
                if (personStatus!= null) {
                    if( (personStatus.getId() <= 1) || personStatus.getTitle().toLowerCase().
                            matches(".+(Standby).+") ) {
                        amountOfKilometersContainer.setVisibilityAllowed(false);
                    } else {
                        callContainer.setVisibilityAllowed(true);
                    }
                    target.add(callContainer);
                }
            }
        });
        exampleForm.add(chsStatus);

        this.callContainer = new WebMarkupContainer("callContainer");
        this.callContainer.setOutputMarkupPlaceholderTag(true).setOutputMarkupId(true);
        this.callContainer.setVisibilityAllowed(true);

        exampleForm.add(this.callContainer);

        this.callContainer.add(new Button("btnCall")
        {
            @Override
            public void onSubmit() {
                super.onSubmit();
                call();
            }
        });

        this.add(exampleForm);
    }
}

/**
 * The choice render class for the statuses.
 */
private class StatusChoiceRenderer
            extends ChoiceRenderer<Status>
{

    /**
     * Constructor:
     */
    public StatusChoiceRenderer()
    {
        super();
    }

    /**
     * @return The display value of the status
     * @param status The Status
     */
    @Override
    public Object getDisplayValue(Status status) {
        return status.getStatus();
    }
}
<!DOCTYPE html>
<html>
    <head>
        <title>Example Page - Experience System</title>
        <meta http-equiv="Content-Type" content="text/html; charset=UTF-8">
    </head>
    <body>
    <wicket:extend>
        <p>This an example page</p>
        <form wicket:id="exampleForm">
            <label>This is an example of the form</label>
            <fieldset>
                <select wicket:id="chsStatus" >
                    <option selected="selected">Choose a status</option>
                    <option>OK</option>
                    <option>Standby</option>
                </select>
            </fieldset>
            <fieldset wicket:id="callContainer">
                   <input wicket:id="btnCall" type="submit" value="Call" />
            </fieldset>
        </form>
    </wicket:extend>
</body>
</html>
I want a main page in Apache Wicket
So, We’ve set up the database and domain, now it’s time for the GUI. With Wicket.
Of course we’ve to start the initialisation Class for our application:
package com.rivaso.exp.web;

import org.apache.wicket.Page;
import org.apache.wicket.authroles.authentication.AbstractAuthenticatedWebSession;
import org.apache.wicket.authroles.authentication.AuthenticatedWebApplication;
import org.apache.wicket.markup.html.WebPage;
import org.wicketstuff.javaee.injection.JavaEEComponentInjector;

import com.rivaso.exp.web.secure.SignInPage;
import com.rivaso.exp.web.secure.EXPAuthenticatedWebSession;
import com.rivaso.exp.web.tests.TestOverviewPage;

/**
 * @author RiVaSo
 * @version 1.0
 */
public class Main extends AuthenticatedWebApplication {

	public Main() {
	}

	@Override
	protected void init() {
		super.init();
		super.getComponentInstantiationListeners().add(new JavaEEComponentInjector(this));
		getDebugSettings().setDevelopmentUtilitiesEnabled(true);
	}

	@Override
	public Class<? extends Page> getHomePage() {
		return MainPage.class;
	}

	@Override
	protected Class<? extends AbstractAuthenticatedWebSession> getWebSessionClass() {
		return EXPAuthenticatedWebSession.class;
	}

	@Override
	protected Class<? extends WebPage> getSignInPageClass() {
		return SignInPage.class;
	}
}
Then we create the class for the SignInPage:
package com.rivaso.exp.web.secure;

import org.apache.wicket.request.mapper.parameter.PageParameters;

import com.rivaso.exp.web.BasePage;

/**
 * @author RiVaSo
 * @version 1.0
 */
public class SignInPage extends BasePage {

	private static final long serialVersionUID = 97;

	public SignInPage() {
		this(null);
	}

	/**
	 * Constructor:
	 *
	 * @param parameters The page parameters
	 */
	public SignInPage(final PageParameters parameters) {
		add(new JEESignInPanel("signInPanel"));
	}
}
As you could see, we’ve to create the J2EE Sign In Panel:
package com.rivaso.exp.web.secure;

import org.apache.wicket.authroles.authentication.panel.SignInPanel;

/**
 * @author RiVaSo
 * @version 1.0
 */
public class JEESignInPanel extends SignInPanel {

	private static final long serialVersionUID = 96L;

	public JEESignInPanel(String id) {
		super(id);
	}

	public JEESignInPanel(String id, boolean rememberMe) {
		super(id, rememberMe);
	}

	@Override
	protected void onBeforeRender() {
		EXPAuthenticatedWebSession.getExpAuthenticatedWebSession().checkJEEAuthentication();
		super.onBeforeRender();
	}
}
And here we have the HTML-side of the SignInPage:
<!DOCTYPE html>
<html>
    <head>
        <title>Please Sign In</title>
        <meta http-equiv="Content-Type" content="text/html; charset=UTF-8">
    </head>
    <body>
    <wicket:extend>
        <span wicket:id="signInPanel"/>
    </wicket:extend>
</body>
</html>
Of course, also a NotAuthenthicatedPage and SignOutPage should be created:
package com.rivaso.exp.web.secure;

import com.rivaso.exp.web.BasePage;

public class NotAuthenthicatedPage extends BasePage {

	private static final long serialVersionUID = 0L;
}
<!DOCTYPE html>
<html>
    <head>
        <meta http-equiv="Content-Type" content="text/html; charset=UTF-8">
        <title>Not Authenthicated or Authorized</title>
    </head>
    <body>
    <wicket:extend>
        <h2>Forbidden</h2>
        <p>You're not authorized or authenthicated for using this application.</p>
        <br />
        <p>Please contact the administrators for requesting access.</p>
    </wicket:extend>
</body>
</html>
package com.rivaso.exp.web.secure;

import com.rivaso.exp.web.BasePage;
import com.rivaso.exp.web.UserPage;
import org.apache.wicket.markup.html.link.BookmarkablePageLink;
import org.apache.wicket.markup.html.link.Link;
import org.apache.wicket.request.mapper.parameter.PageParameters;

/**
 * @author RiVaSo
 * @version 1.0
 */
public class SignOutPage
        extends BasePage
{
    /**
     * Constructor:
     * @param parameters Page parameters
     */
    public SignOutPage( final PageParameters parameters )
    {
        getSession().invalidate();
        add( new BookmarkablePageLink( "linkContinue", UserPage.class ) );
    }
}
<!DOCTYPE html>
<html>
    <head>
        <title>You're logged out now</title>
        <meta http-equiv="Content-Type" content="text/html; charset=UTF-8">
    </head>
    <body>
    <wicket:extend>
        <p>You're logged out now. Goodbye</p>
        <wicket:link><a href="#" wicket:id="linkContinue">Continue</a></wicket:link>
    </wicket:extend>
</body>
</html>
And now we’ve to Create a special class to initailze a session:
package com.rivaso.exp.web.secure;

import java.security.Principal;

import javax.ejb.EJB;
import javax.servlet.ServletException;
import javax.servlet.http.HttpServletRequest;

import org.apache.wicket.RestartResponseException;
import org.apache.wicket.authroles.authentication.AuthenticatedWebSession;
import org.apache.wicket.authroles.authorization.strategies.role.Roles;
import org.apache.wicket.injection.Injector;
import org.apache.wicket.request.Request;
import org.apache.wicket.request.cycle.RequestCycle;
import org.slf4j.Logger;
import org.slf4j.LoggerFactory;

import com.rivaso.exp.domain.Person;
import com.rivaso.exp.domain.Position;
import com.rivaso.exp.manager.PersonManager;
import com.rivaso.exp.web.Main;
import com.rivaso.exp.web.SetupPage;

/**
 * @author RiVaSo
 * @version 1.0
 */
public class ExpAuthenticatedWebSession
        extends AuthenticatedWebSession {

    private static final long serialVersionUID = 996L;

	@EJB (name = "PersonManager")
	private PersonManager personManager;

    private Person authenticated;

    private transient Logger log = LoggerFactory.getLogger(EXPAuthenticatedWebSession.class);

    public EXPAuthenticatedWebSession(Request request) {
        super(request);
        Injector.get().inject(this);
    }

    public static EXPAuthenticatedWebSession getEXPAuthenticatedWebSession() {
        return (EXPAuthenticatedWebSession) get();
    }

    @Override
    public boolean authenticate(String emailAddress, String password) {
        emailAddress = emailAddress.toLowerCase();
        // Login using JEE security
        HttpServletRequest servletRequest = (HttpServletRequest) RequestCycle.get().getRequest().
                getContainerRequest();
        try {
            servletRequest.login(emailAddress, password);
            signIn(true);
            matchGlobalWithLocalUser(emailAddress);
        } catch (ServletException e) {
            // If login fails we come here
            return false;
        }
        return true;
    }

    private void matchGlobalWithLocalUser(String emailAddress) {
        try {
            Person personFound = personManager.getPersonByEmail(emailAddress);
            if (personFound != null && (personFound.isInPostion(Position.USER) || personFound.
                    isInPostion(Position.ADMIN))) {
                authenticated = personFound;
            }
        } catch (Exception ex) {
            log.error("Error by getting person", ex);
        }
        if (this.authenticated == null) {
			if (personManager.count() == 0 ) {
                // Go to setup page. First time use.
                throw new RestartResponseException(SetupPage.class);
            } else {
                throw new RestartResponseException(NotAuthenthicatedPage.class);
            }
        } else {
            throw new RestartResponseException(NotAuthenthicatedPage.class);
        }
    }

    @Override
    public Roles getRoles() {
        if (isSignedIn()) {
            return new Roles(authenticated.getRoles());
        }
        return null;
    }

    public Person getAuthenticated() {
        return this.authenticated;
    }


    /**
     * Checks if user is already logged in with JEE security and signs the user in if so.
     * Restart the response if no user is found.
     *
     * No visible modifier. Only class from this package may call this method.
     */
    void checkJEEAuthentication() {
        HttpServletRequest servletRequest = (HttpServletRequest) RequestCycle.get().getRequest().
                getContainerRequest();
        Principal userPrincipal = servletRequest.getUserPrincipal();
        if (userPrincipal != null && userPrincipal.getName() != null) {
            signIn(true);
            matchGlobalWithLocalUser(userPrincipal.getName());
        }
    }
}
And now we make the class for BasePage, which will be inherited by all our pages.
package com.rivaso.exp.web;

import org.apache.wicket.Component;
import org.apache.wicket.behavior.AttributeAppender;
import org.apache.wicket.markup.html.WebPage;
import org.apache.wicket.markup.html.basic.Label;
import org.apache.wicket.markup.html.link.BookmarkablePageLink;
import org.apache.wicket.markup.html.list.AbstractItem;
import org.apache.wicket.model.PropertyModel;

import com.rivaso.exp.domain.Person;
import com.rivaso.exp.domain.Position;
import com.rivaso.exp.web.secure.SignOutPage;
import com.rivaso.exp.web.secure.EXPAuthenticatedWebSession;

/**
 * @author RiVaSo
 * @version 1.0
 */
public class BasePage extends WebPage {

	private static final long serialVersionUID = -166L;

	public BasePage() {
		super();
		final EXPAuthenticatedWebSession expAWS = EXPAuthenticatedWebSession.getExpAuthenticatedWebSession();
		add(createMenuLI(new AbstractItem("userLI")).add(new BookmarkablePageLink<Void>("user", UserPage.class)));
		add(createMenuLI(new AbstractItem("experienceLI")).add(new BookmarkablePageLink<Void>("experience", ExperiencePage.class)));
		add(createMenuLI(new AbstractItem("adminLI")).add(new BookmarkablePageLink<Void>("admin", AdminPage.class) {
			private static final long serialVersionUID = 1L;

			protected void onConfigure() {
				if (expAWS.isSignedIn() && expAWS.getAuthenticated() != null && expAWS.getAuthenticated().isInPostion(Position.ADMIN)) {
					setVisibilityAllowed(true);
				} else {
					setVisibilityAllowed(false);
				}
			};
		}));
		add(createMenuLI(new AbstractItem("logoutLI")).add(new BookmarkablePageLink<Void>("logout", SignOutPage.class) {
			private static final long serialVersionUID = 1L;

			protected void onConfigure() {
				if (expAWS.isSignedIn()) {
					setVisibilityAllowed(true);
				} else {
					setVisibilityAllowed(false);
				}
			};
		}));
		add(new Label("loggedin", new PropertyModel<Person>(this, "session.authenticated.emailAddress")));
	}

	private AbstractItem createMenuLI(AbstractItem li) {
		li.add(new LinkActiveModifier());
		return li;
	}

	class LinkActiveModifier extends AttributeAppender {
		public LinkActiveModifier() {
			super("class", "active");
			super.setSeparator(" ");
		}

		private static final long serialVersionUID = 1L;

		@SuppressWarnings("rawtypes")
		@Override
		public boolean isEnabled(Component component) {
			if (component instanceof AbstractItem) {
				AbstractItem li = (AbstractItem) component;
				Component component2 = li.get(0);
				if (component2 instanceof BookmarkablePageLink) {
					BookmarkablePageLink bpl = (BookmarkablePageLink) component2;
					if (bpl.linksTo(BasePage.this.getPage())) {
						return true;
					}
				}
			}
			return false;
		}
	}
}
<!DOCTYPE html>
<html lang="en">
    <head>
        <meta charset="UTF-8">
        <title>The Experience System</title>
        <meta name="description" content=""/>
        <meta name="keywords" content=""/>
        <link rel="icon" type="image/png" href="">
        <link rel="stylesheet" href="css/style.css" type="text/css" media="screen" />
    </head>
    <body id="home">
        <div id="page">
            <div id="header">
                <a href="/en/">
                    <img src="css/img/logo.jpg" id="logo" alt="logo"/>
                </a>
                <ul id="main_nav">
                    <li wicket:id="userLI" class="first ">
                        <a href="#" wicket:id="user">User</a>
                    </li>
                    <li wicket:id="experienceLI"  class="">
                        <a href="#" wicket:id="experience">Experience</a>
                    </li>
                    <li wicket:id="adminLI"  class="">
                        <a href="#" wicket:id="admin">Admin</a>
                    </li>
                    <li wicket:id="logoutLI"  class="">
                        <a href="#" wicket:id="logout">Logout</a>
                    </li>
                </ul>
            </div>
            <div id="content_bg">
                <div class="seperator">
                </div>
            </div>
            <div id="content">
                <wicket:child />
            </div>
            <div class="clear"></div>
            <div id="footer-push"></div>
        </div>
        <div id="footer-wrap">
            <div id="footer">
            	<ul class="left">© RiVaSo 2012</ul>
                <ul>
                    <li><span wicket:id="loggedin"></span></li>
                </ul>
            </div>
        </div>
    </body>
</html>
Now it’s time to make a main page, I’ve chosen to use the profile page of the user for that:
package com.rivaso.exp.web;

import com.rivaso.exp.domain.Person;
import com.rivaso.exp.domain.Position;
import com.rivaso.exp.web.secure.NotAuthenthicatedPage;
import com.rivaso.exp.web.secure.EXPAuthenticatedWebSession;
import javax.naming.AuthenticationException;
import org.apache.wicket.authroles.authorization.strategies.role.annotations.AuthorizeInstantiation;
import org.apache.wicket.markup.html.basic.Label;

/**
 *
 * @author RiVaSo
 * @version 1.0
 */
@AuthorizeInstantiation ({Position.ADMIN_STRING, Position.USER_STRING})
public class MainPage
        extends BasePage {

    private static final long serialVersionUID = 2446731116379770530L;

    public MainPage() {
        super();

        try {
            EXPAuthenticatedWebSession aws = (EXPAuthenticatedWebSession) this.getSession();

            if (aws.isSignedIn()) {
                showMainPage();
            } else {
                throw new AuthenticationException("Not signed in.");
            }
        } catch (AuthenticationException ex) {
            // Not signed in.
            ex.printStackTrace();
            this.redirectToInterceptPage(new NotAuthenthicatedPage());
        }

    }

    private void showMainPage() {
        EXPAuthenticatedWebSession aws = (EXPAuthenticatedWebSession) this.getSession();
        Person person = aws.getAuthenticated();

        String skills = "";
        String skillsDone = "";
        if (person != null) {
            skills = person.getTotalAmountOfSkills() + "";
            skillsLeft = person.getAmountOfSkillsLeft() + "";
        }
        add(new Label("lblFirstName", person.getFirstName()));
        add(new Label("lblSurName", person.getSurName()));
        add(new Label("lblEmailAddress", person.getEmailAddress()));
        add(new Label("lblAmountOfSkillsLeft", skillsLeft));
        add(new Label("lblAmountOfSkills", skills));
    }
}
<!DOCTYPE html>
<html>
    <head>
        <title>UserPage - Experience System</title>
        <meta http-equiv="Content-Type" content="text/html; charset=UTF-8">
    </head>
    <body>
    <wicket:extend>
        <h2>Welcome <span wicket:id="lblFirstName">Pleased</span> <span wicket:id="lblSurName">User</span></h2>
        <p>Your email-address is: <span wicket:id="lblEmailAddress">person@riva.so</span></p>
        <wicket:enclosure child="">
            <p>You have <span wicket:id="lblAmountOfSkillsLeft">a few</span> of the <span wicket:id="lblAmountOfSkills">big amount</span> skills left.</p>
        </wicket:enclosure>
    </wicket:extend>
</body>
</html>
As you could see… the tag <wicket:id> is used to insert information from the ‘logical layer’ (the Class) into your html.
The <wicket:child>-tag in the BasePage is to clarify that Wicket should put the content in the <wicket:extend>-tags of the html-versions of the childs classes inherited from BasePage.
The <wicket:enclosure>-tags are used to specify that if the content is null of a <wicket:child>-tag placed within the <wicket:enclosure>-tags, the content won’t be shown.
The attribute “child” is used to target a specific wicket:id. If you want to deactivate a specific nested wicket:id, use the attribute like this way: <wicket:enclosure child=”[parent-wicket:id]:[target-wicket:id]”>
Now, the next step it’s more on you. I’ll only give some examples for creating GUI components.
Let’s handle the database via the sourcecode
Before we could connect to the database, we have edit persist.xml file to configure EclipseLink to connect to the database. When you use the default configuration for EclipseLink, then you should have to edit a lot in that file.
It looks a bit like this:
<?xml version="1.0" encoding="UTF-8"?>
<persistence version="2.0" xmlns="http://java.sun.com/xml/ns/persistence" xmlns:xsi="http://www.w3.org/2001/XMLSchema-instance" xsi:schemaLocation="http://java.sun.com/xml/ns/persistence http://java.sun.com/xml/ns/persistence/persistence_2_0.xsd">
  <persistence-unit name="com.rivaso_exp" transaction-type="JTA">
    <provider>org.eclipse.persistence.jpa.PersistenceProvider</provider>
    <jta-data-source>/jdbc/expdb</jta-data-source>
    <exclude-unlisted-classes>false</exclude-unlisted-classes>
    <properties>
      <property name="eclipselink.ddl-generation.output-mode" value="database"/>
      <property name="hibernate.hbm2ddl.auto" value="create-drop"/>
      <property name="eclipselink.ddl-generation" value="drop-and-create-tables"/>
    </properties>
  </persistence-unit>
</persistence>
And then we should make a connector to it: This is easy done with an entity manager.
To achieve that, we have to make an abstract class which covers many the basic actions you want to do on a database like counting, getting the highest used id (which is definitely not the same as the amount of entities in your table!), create, edit and remove.
Make a class like this:
package com.rivaso.exp.facade;

import java.util.List;

import javax.persistence.EntityManager;
import javax.validation.ConstraintViolation;
import javax.validation.ConstraintViolationException;

/**
 * @author RiVaSo
 * @version 1.0
 */
public abstract class AbstractManager {

    private Class entityClass;

    public AbstractManager(Class entityClass) {
        this.entityClass = entityClass;
    }

    protected abstract EntityManager getEntityManager();

    public void create(T entity) {
        getEntityManager().persist(entity);
    }

    public void edit(T entity) {
        getEntityManager().merge(entity);
    }

    public void remove(T entity) {
        getEntityManager().remove(getEntityManager().merge(entity));
    }

    public T find(Object id) {
        return getEntityManager().find(entityClass, id);
    }

    @SuppressWarnings ({"rawtypes", "unchecked"})
    public List findAll() {
        javax.persistence.criteria.CriteriaQuery cq = getEntityManager().getCriteriaBuilder().
                createQuery();
        cq.select(cq.from(entityClass));
        return getEntityManager().createQuery(cq).getResultList();
    }

    @SuppressWarnings ({"rawtypes", "unchecked"})
    public List findRange(int[] range) {
        javax.persistence.criteria.CriteriaQuery cq = getEntityManager().getCriteriaBuilder().
                createQuery();
        cq.select(cq.from(entityClass));
        javax.persistence.Query q = getEntityManager().createQuery(cq);
        q.setMaxResults(range[1] - range[0]);
        q.setFirstResult(range[0]);
        return q.getResultList();
    }

    @SuppressWarnings ({"rawtypes", "unchecked"})
    public int count() {
        javax.persistence.criteria.CriteriaQuery cq = getEntityManager().getCriteriaBuilder().
                createQuery();
        javax.persistence.criteria.Root rt = cq.from(entityClass);
        cq.select(getEntityManager().getCriteriaBuilder().count(rt));
        javax.persistence.Query q = getEntityManager().createQuery(cq);
        return ((Long) q.getSingleResult()).intValue();
    }

    @SuppressWarnings ({"rawtypes", "unchecked"})
    public int getCurrentMaxOfId() {
        javax.persistence.criteria.CriteriaQuery cq = getEntityManager().getCriteriaBuilder().
                createQuery();
        javax.persistence.criteria.Root rt = cq.from(entityClass);
        cq.select(getEntityManager().getCriteriaBuilder().max(rt.get("id")));
        javax.persistence.Query q = getEntityManager().createQuery(cq);
        Object result = q.getSingleResult();
        if (result == null) {
            return 0;
        }
        return ((Integer) result).intValue();
    }
}
Then extend that abstract class with your own class which you want to use, like for example PersonManager:
package com.rivaso.exp.manager;

import com.rivaso.exp.domain.Person;
import javax.ejb.Stateless;
import javax.persistence.EntityManager;
import javax.persistence.NoResultException;
import javax.persistence.PersistenceContext;

import org.slf4j.Logger;
import org.slf4j.LoggerFactory;

/**
 *
 * @author RiVaSo
 * @version 1.0
 */
@Stateless(name = "PersonManager")
public class PersonManager extends AbstractManager<Person> {

	private static Logger log = LoggerFactory.getLogger(PersonManager.class);

	@PersistenceContext(unitName = "com.rivaso_exp")
	private EntityManager em;

	@Override
	protected EntityManager getEntityManager() {
		return em;
	}

	public PersonManager() {
		super(Person.class);
	}

	public Person getPersonByEmail(String personEmail) {
		try {
			return (Person) em
				.createQuery("SELECT OBJECT(Person) FROM Person person WHERE person.emailAddress = :personEmail")
				.setParameter("personEmail", personEmail).getSingleResult();
		} catch (NoResultException e) {
			log.warn("Person could not be found");
		} catch (Exception e) {
			log.warn("Could not get PersonByMail", e);
		}
		return null;
	}
}
Let’s use JPA now – Part 2: Defining Columns
After we made and understand how to make Tables from our classes, let’s continue by annotating their member variables.
Firstly, you have to keep this in mind:
JPA could only convert primitive datatypes of Java in primitive datatypes of SQL. Objects made of self-brewed classes can only be written directly to the database with the special annotation @Embeddable, or you have to create a special table for them, like we did earlier.
Generic Annotations:
@Transient
Use this annotation when you don’t want that EclipseLink saves the variable to the database. For example converters such as SimpleDateFormat. EclipseLink will pass this member variable and doesn’t make a column for this one.
@Id
The annotation for defining the variable as the primary key of the table. It’s recommended to add at each class a special member-variable when the class has its own table.
@GeneratedValue
The annotation which is recommended for the member-variable which is also annotated with @Id, unless you want to handle the index-value of the entries of the table by yourself.
@NotNull
Handy when you want to enforce that every entry has a value at that column. Please notice that you’ll also get bugged when a 0 is inserted/updated at a column with the INTEGER datatype, because it’s also counted as ‘not null’.
@Null
Contrary of @NotNull, every value is allowed. Is the default setting at each member variable when @NotNull nor @Null is annotated.
@Column (name = “email_address”)
An annotation to add more specific properties for the member value.
It could be very useful, for example since databases doesn’t like the lowerCamelCase- nor UpperCamelCase-style, like:
@NotNull

private String emailAddress;
Should be:
@Column (name = "email_address", nullable=false)

private String emailAddress;
For member variables which are used as primary keys, you could also use it like this:
@Id

@GeneratedValue

@Column (unique = true, nullable = false)

private int id;
In this case the “unique” keyword of @Column says that each value of column should be unique and can’t be used twice in the table.
Type-specific annotations:
@ElementCollection
This one is required for variables which have collections as type.
Please remember that you can’t use direct collection implementations like HashMap, ArrayList, HashSet!
Always use their interface, like Map, List and Set, and use the implementation of the variables at their initialisation!
@Embedded
Use this annotation when the type of the variable is a self-defined class, which don’t have its own table.
The object assigned to this variable will be serialized and saved into the column.
@Temporal
This annotation is used when the type is java.util.Date and java.util.Calendar.
Note that you also have to include an attribute value, like @Temporal(TemporalType.TIMESTAMP), @Temporal(TemporalType.DATE) and @Temporal(TemporalType.TIME).
@Enumerated
Use this annotation when the type of the variable is an ENUM. Please note that ‘ENUM-classes’ don’t have any annotation.
Done with that?
The next thing that we’ll do is talking to your database via the sourcecode.
Let’s use JPA now Part 1: Creating Tables
We make a travel in time. And now we’re at the point that we made a domain model for the logic of our application. Of course, you could indeed build a GUI with Wicket first, it’s a bit what you like the most. In this blogpost I assume you’ve build a working domain model. But now, we have to save our precious data in a database. Instead of building a database with a database-generation program, -or even more dramatically- writing it in PLAIN SQL. We don’t want that because it’s too much work, and time. Instead of that, we’re using JPA (previously known as Hibernate).
What you’ll need:
– A few basic classes
– Configured your IDE to work with an Persistence Service, Like OpenJPA, TopLink or EclipseLink. The latter one is packed and preconfigured in NetBeans.
You could use JPA via an apart XML file or do it with Annotations in your code. It’s up to you which method you like the most, I’m covering the method for using Annotations because I find apart XML files harder to maintain.
There are various things you could define with Annotations.
Let’s start now.
If you want to give your domain class a own table use the annotation @Entity above the define statement of your class, like this:
package com.rivaso.exp.domain;

import java.io.Serializable;
import javax.persistence.Entity;
import javax.persistence.Table;

/**
 *
 * @author RiVaSo
 * @version 1.0
 */
@Entity
@Table( name = "person" )
public class Person
        implements Serializable
{
	// More code goes here
}
As you could see, there is also an annotation included called @Table, where you define that it has a primairy table, in this case the table “Person”.
Please notice that the parameter ‘name = “person”‘ wasn’t needed, because it’s more used to give the Classes who are written in camelcase, a nickname for the database to distinguish them from other classes and SQL-keywords.
Ok, done that. What’s next?
Annotating the member values of the class…so we could define the columns.
How to setup a new PostgreSQL-database in pgAdmin and Glassfish embedded within NetBeans?
In order to get a working Glassfish enviroment with a database to work with, we have to setup a new database first.
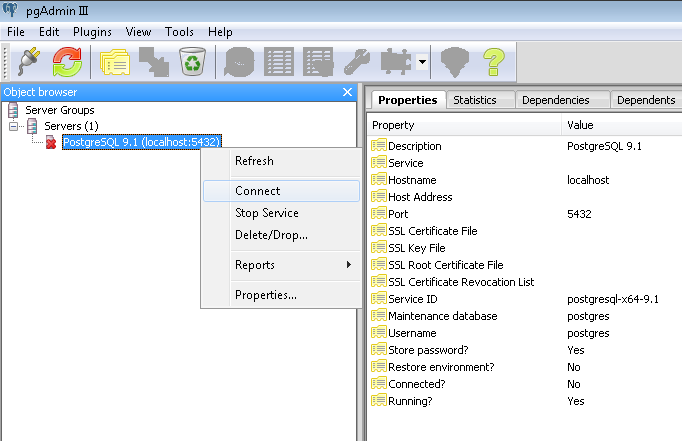
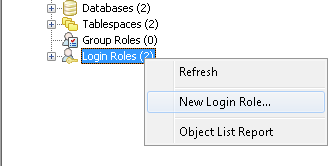
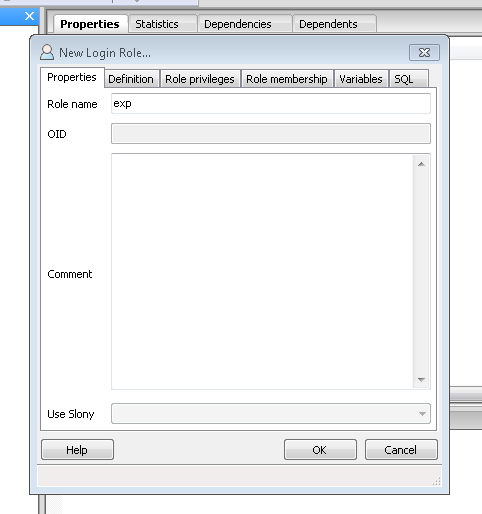
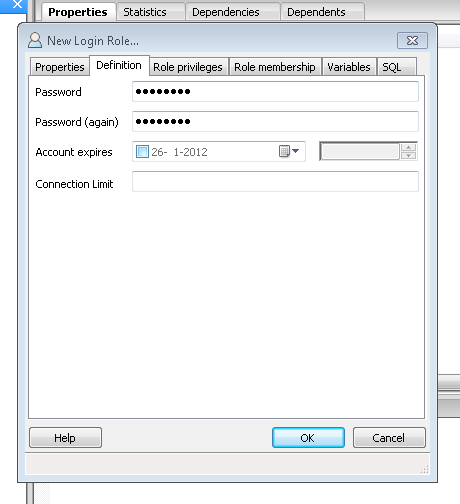
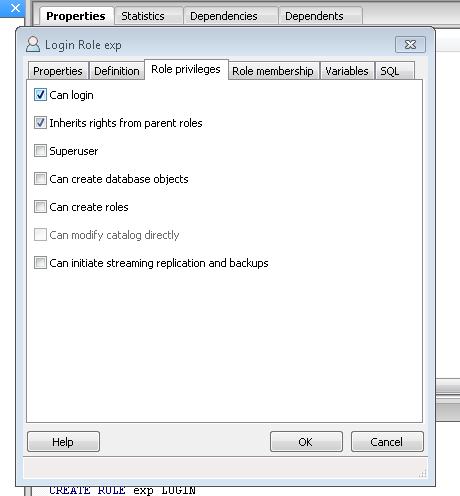
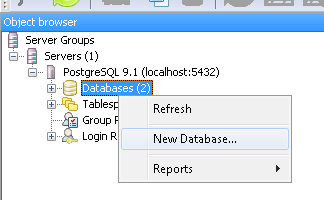
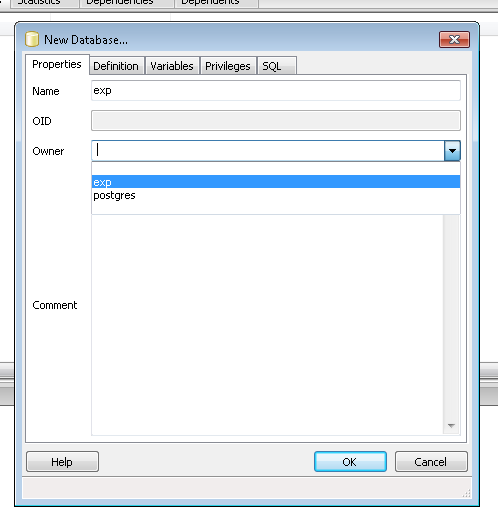
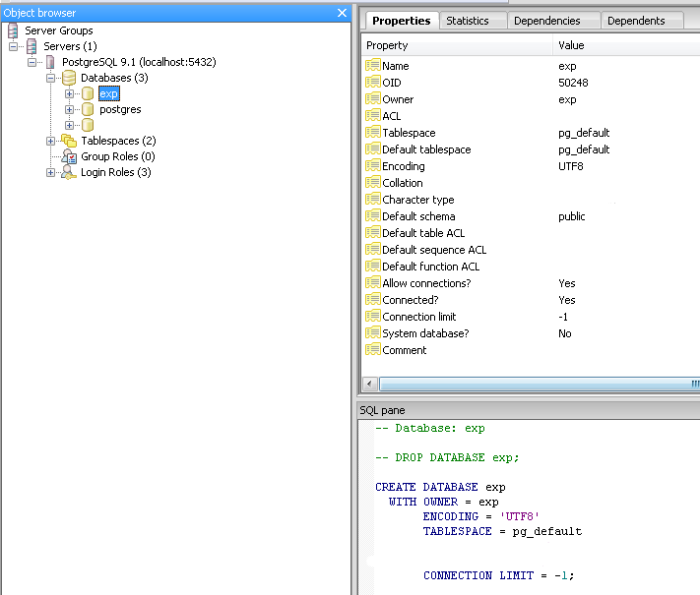
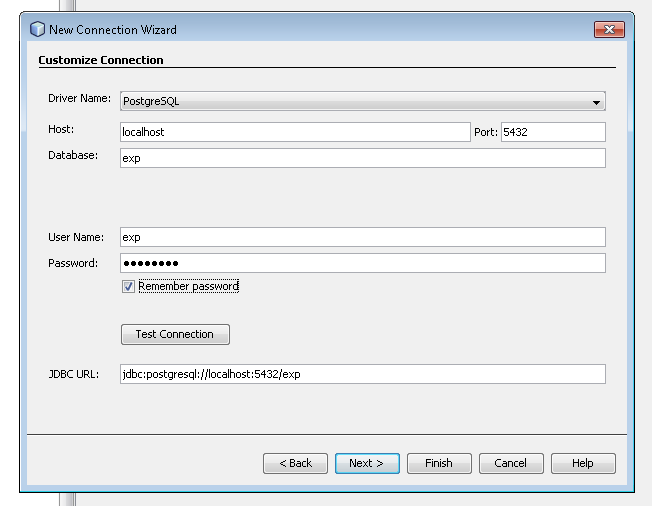
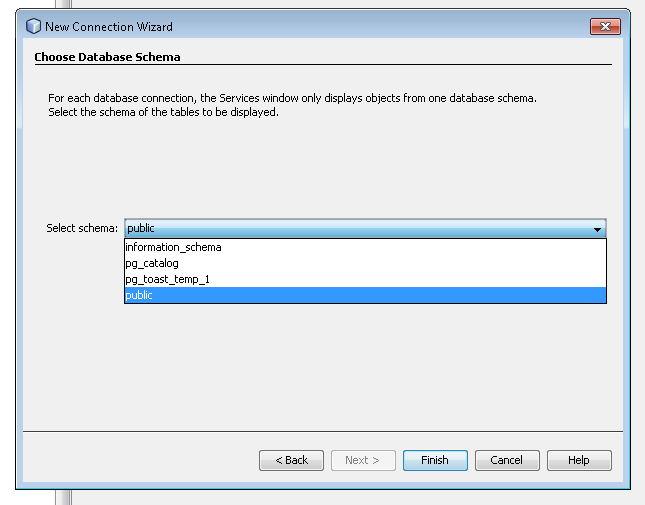
Open pgAdmin, and make a new database via this way:
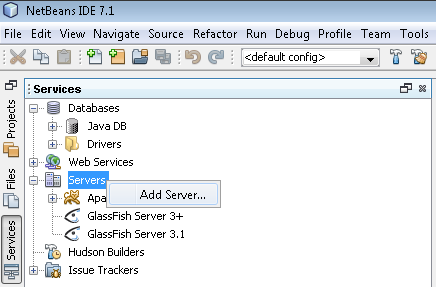
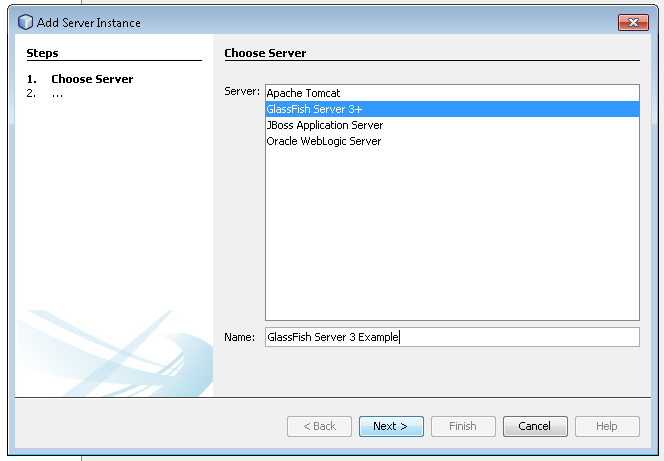
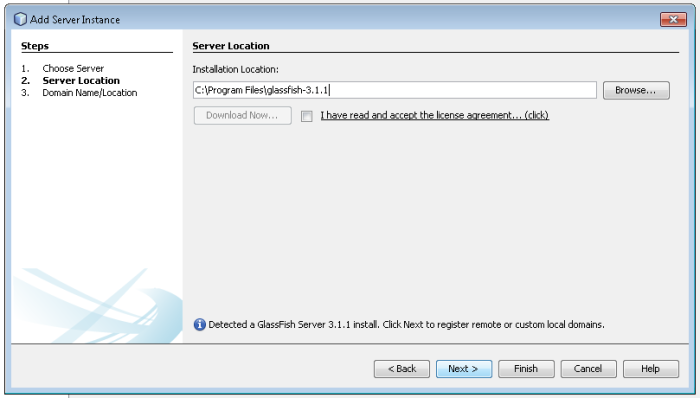
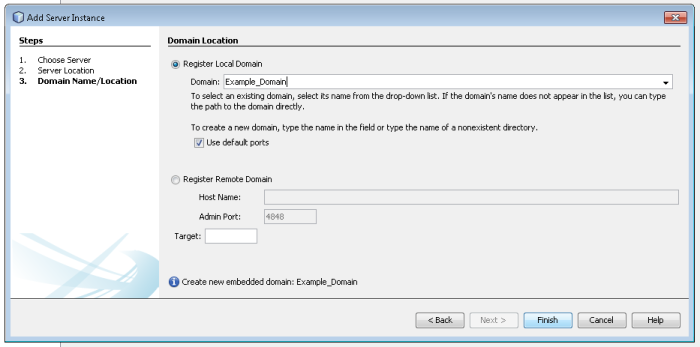
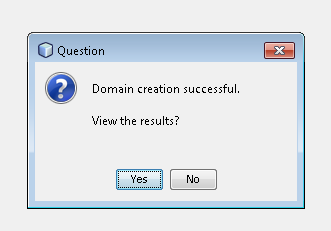
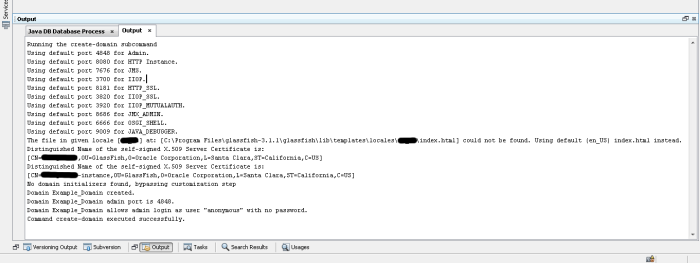
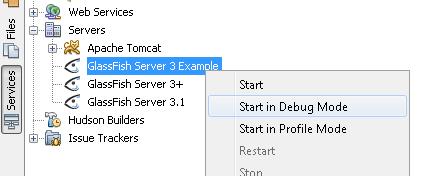
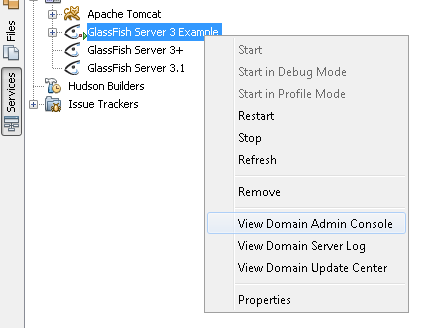
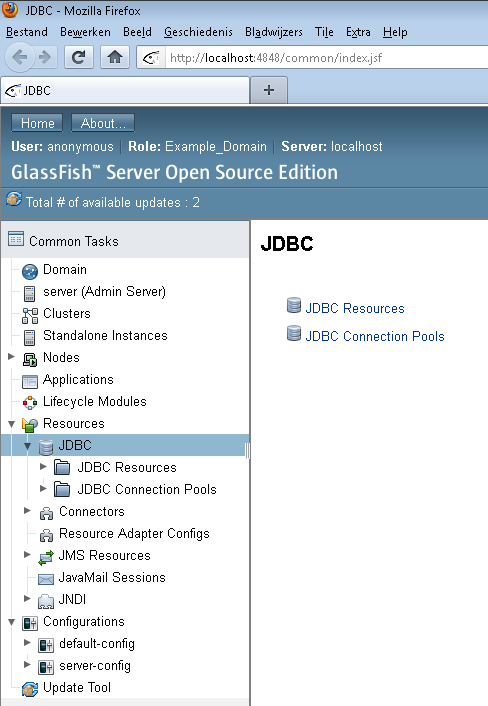
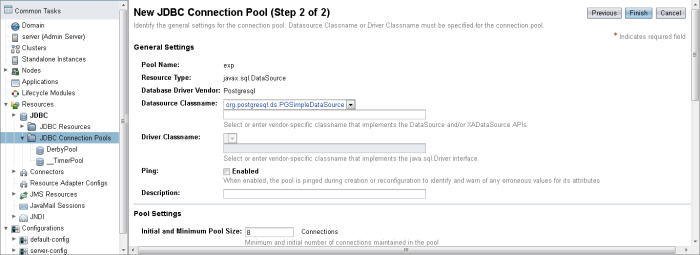
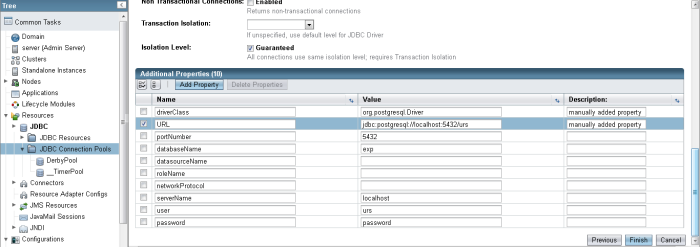
After We’ve done that, we setup glassfish:
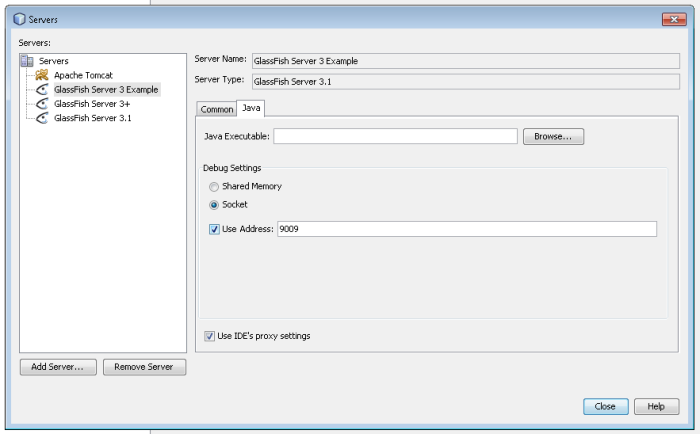
If you want to debug via a socket port, apply these two steps: 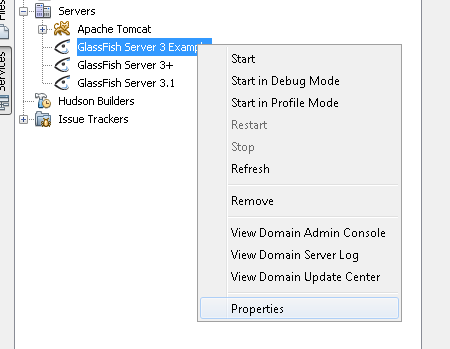
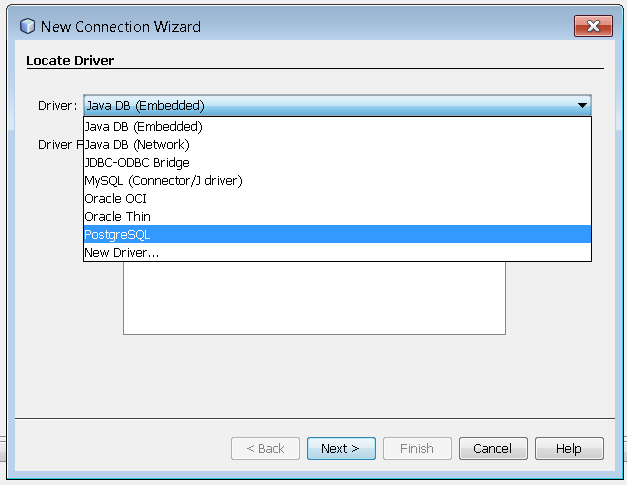
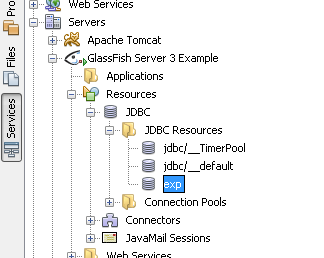
An instance of Glassfish has been created now. Let’s add the database to it: 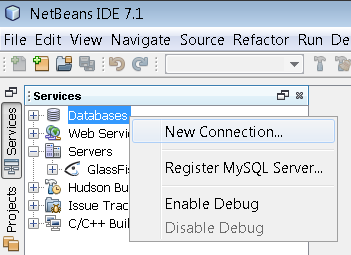
I want a working pom for generating my project!
POM is for the developer sweet candy and ‘too bitter and sour lemon’ at the same time.
From one point it’s a heaven to manage your dependencies, at from another point it’s the source of dependency hell.
Mainly because IDE’s doesn’t have every listing of dependencies, groupIds and artifacts ‘out of the box’-included. So you’ll have to find the rest of the ones you’ll need on the internet. Please double check to be sure nothing is outdated, or turned into a dead project.
I want to develop a java-ee-maven-wicket-postgresql application on Windows!
What you’ll need:
– A windows environment ( WinXP or Win7 are recommended )
– A ‘recently enough’ version of JDK of Java. ( 6u29 )
– A ‘recently enough’ version of PostgreSQL ( 9.1.0-1 )
– A ‘recently enough’ version of Netbeans ( 7.0.1 )
– A ‘recently enough’ version of Maven 2, Standalone installer(because accessing the build-in maven of netbeans via cmd is surprisingly hard ). ( 3.0.3 )
– A ‘recently enough’ version of Wicket ( 1.5.3 )
Begin with installing the JDK, I’m using version 1.6u29, since I’ve read rumours about that version 7 isn’t stable enough yet. Time will tell. I didn’t tried to install Java EE SDK including Glassfish, because NetBeans has an embedded Glassfish instance at its own.
Please note that you don’t have to install pgAdmin ( the admin tool for your PostgreSQL DB ), it’s already included in the PostgreSQL installer.
Note that you’ve to unpack Maven by yourself, and don’t forget to add it to your (system) path of your system environment, create also two new system environment variables: JAVA_HOME ( preferably C:\Program Files\Java\jre6\ WITHOUT quotes ) and CLASSPATH ( .;%JAVA_HOME%\lib ).
